Warning: Use of undefined constant headerfavicons - assumed 'headerfavicons' (this will throw an Error in a future version of PHP) in /home/thetoryp/www/www/wp-content/plugins/easy-favicon/easy-favicon.php on line 6231
Warning: Use of undefined constant headerfavicons - assumed 'headerfavicons' (this will throw an Error in a future version of PHP) in /home/thetoryp/www/www/wp-content/plugins/easy-favicon/easy-favicon.php on line 6279
Warning: Use of undefined constant headerfavicons - assumed 'headerfavicons' (this will throw an Error in a future version of PHP) in /home/thetoryp/www/www/wp-content/plugins/easy-favicon/easy-favicon.php on line 6327 twee Archives - The Tory PartySkip to content
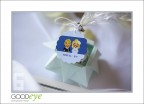
We love Half-Life. We love Portal. We love Portal 2. Valve Corporation wedding cake toppers were inevitable.
Portal gun and crowbar together at last
Again, high excitability = no process shots. Please forgive my shame.
The cake is a truth
The cube and figures are polymer clay over a tightly packed foil base. My hands are strong now. Like, Rockbiter strong. Mmm, delicious limestone.
Anyhoo.
I baked the Companion Cube first so the figures had something sturdy to sit on. Yes, this means they have Companion Cube grooves molded into their cabooses. No, that is not a problem.
Groom Gordon’s crowbar took damage. This is expected.
I didn’t print out my Companion Cube reference and thus missed the center lines on each side before baking. Fortunately a little Sharpie fixes that right up.
For each figure, I worked from the feet up. I sculpted up to the waist, and then I baked that. Then I sculpted the waist to the shoulders and baked that. This worked great for preserving the stability and sculpt of the figure overall, but it did mean the Bride Chell feet got a little toasty by the end.
Hobbit feet up in this piece
I justify this by saying Chell’s feet would probably get grubby running around those experiments, Long Fall Boots or no.
I finished the faces last which really gave me a chance to concentrate on them.
Unity!
The characters were originally designed to hold hands and look back at the viewer, but only if they’re sitting on a certain face of the Companion Cube and if you mess with them just right.
On the day of the wedding, due to venue snafuage, it was up to two kind and loving friends — my Original Heckling Partner and her sister — to choose how the figures should sit. And I like what they did much better. It seems more sweet and tender and fun to have the figures reaching out for each other. (And it’s probably a major reason they didn’t get knocked over.)
Stability is key
Today the figures are sitting behind glass, so the cat can’t get to them. In this way, follow-through is very important.
As I’ve said, I’m a fan of gift-wrapping cardboard boxes for instant fancy baskets. So it was an easy thing to put together a wedding bathroom emergency kit.
Wee paper dress optional
What went in it:
Chewing gum (mint and fruit!)
Laundry stain wipes
Contact lens solution
Adhesive bandages
Hand lotion
Ibuprofen
Effervescent antacid
Antiseptic wipes
Chewable antacid
Other things that could have gone in it:
Mini hairspray
Mouthwash
Mini sewing kit
Safety pins
It’s a very easy and rewarding place to go overboard. Stuff did get used. I brought the remainder to work, where it’s still getting some mileage. There’s no wrong place for fruit gum, yo.
You cannot give a woman a budget and a year of lead time and not expect some papercraft all up in this piece. Thus the origami escort cards.
(There is also a tale of venue snafu and caboose-saving, but it must wait for another day.)
Names have been changed to protect the innocent
The origami will fit just fine in place card holders. I knew I wanted to display mine vertically, since table space was limited.
Display Stand
So when our duplex-mates attempted to throw out a mirror frame, I was all like, “Nuh-uh, you are getting repurposed as heck.” Me and the groom picked out some soft green paint, and over the next couple of days I primed and painted the frame in the driveway, leaving plenty of distance from cars and using ample drop cloth to keep our landlords from murdering me.
Apparently I was too excited to take process photos. Be assured it was as gripping as spray-painting a wooden frame can be. Here is a photo of the finished product instead:
Low angles rule
Knowing we had about 70 guests, I got my tape measure and made marks for twelve evenly-spaced rows. I figured I’d staple-gun ribbon in a grid and clip the escort cards to the ribbon with tiny clothespins.
Once I saw the grid and its space limitations, I realized each card couldn’t be more than two inches wide. Maybe they could be more vertical?
They’d end up looking something like shirts on a line.
Hmm…
Origami Escort Cards
I knew origami shirts existed. Maybe I could do dresses for the ladies? Is it OK to enforce a gender binary if it’s super cute?
The trick was getting paper the right size. The shirt folds down much smaller than the dress. I ended up using 4″ x 4″ (10 cm x 10 cm) paper for the dress and 6″ x 3″ (15.24 cm x 7.62 cm) paper for the shirts.
Yes, I had to cut down many pieces of nice washi paper to get the right size for the dresses. No, I couldn’t figure anything to do with the excess.
Adorbed.
It took three or four hours of folding, which goes great with a season of Better Off Ted.
Assembly
Using an extra-fine Sharpie pen, I wrote names on the front and the table numbers on the back. Even with the permanent marker, until the ink dried it was possible to smear them, so I had to take care and not rush. Also, your hand can tell when you’re trying to write carefully and will make you skip consonants at every opportunity.
I hung all the cards alphabetically by last name. Then I wrapped the frame in garbage bags and strapping tape until it was nice and secure. It made the journey to the wedding intact — unless I only think that because someone saved my bacon without my knowledge, which is very possible.
Voila!
And this chair fit the bill just right to hold it
When I got to the reception and found that two clever guests launched a trend of wearing the escort cards as nametags!
Fun as heck.
It was a rad bonus and a double hoot. I recommend it!
No, I am not done with the twee papercraft. Yes, I know it is getting a little wacky. But here are the origami wedding favors.
8-bit motif optional
Origami
I ordered three packs of Japanese Tant Origami Paper in blue and used all the pastel shades. Also I notice I did this in May of last year. It’s possible I had some excess excited energy to work off.
And I applied some glue stick to keep the petals stuck.
The Tags
Small to encourage you to make your own.
I ordered the tags from MyOwnLabels.com. They come pre-perforated with a little white string to tie them on. I ordered small cellophane bags from them, too.
The Candy
Sassy phrases at your discretion
I went with custom-printed M&Ms. I poked around and figured the most cost-effective way to do this was to order 5 lbs. of blank white M&Ms from A Candy Store and 2 lbs. of multi-colored custom-printed M&Ms from the M&M website
Do place your orders like a month in advance, since they will take time to arrive and assemble.
Assembly
The M&Ms come with a little measuring scoop. You should wash it before using, but don’t be like me and dry it in haste. You will end up with damp M&Ms and be quite unhappy with yourself.
It took 2 or 3 hours to put them together. Pretty simple!
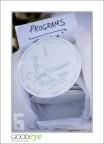
Again, you cannot give a woman a to-do list and a year of lead time and not expect some wedding papercraft programs up in this piece.
Names blurrified to protect the innocent
I considered a lot of options for programs. Fans are cool, and seed fans are super cool. But I couldn’t justify the cost and materials of printing them — not to mention we were expecting only 70 guests, which is a scant number for a formal print job.
Somewhere — and for the life of me I can’t track it down again — I saw someone post about a rotating dial program. This person’s even had a pocket for bubbles. I’m going to keep trying to find it so I can credit it. Holler if you know what I’m talking about.
Anyway, The dial thing was charming as heck and seemed like a fun thing to do for a ceremony with a small wedding party.
I put the names of party members (parents, officiant, maid of honor, best man, musician, etc.) radially on one side. On the other I put the actual program, a drawing and an expression of gratitude to all our guests.
Designing
I worked up everything in Illustrator, taking madd advantage of its rotation and font tools. I worked from the same template for both dials and prayed I got everything right so the circles would all match up. I must have been careful enough, because they did.
Printing
I got almost all our printing (save-the-dates, invitations, RSVPs) done by Overnight Prints, and the programs were no exception. (Overnight Prints asked me to share their current coupon codes, which you might enjoy.) I ordered the pieces as postcards, which is possibly not the best choice for everyone. The paper is VERY hardy and tough to cut with a X-ACTO. Even with scissors, it was hard to get a smooth edge on the circles, but they still turned out all right and I don’t think anyone noticed, or at least I never heard, “HEY, THESE CIRCLES AREN’T VERY SMOOTH.”
However printing the pieces as postcards meant the resulting programs were VERY sturdy, which was great. If you aren’t sure what kind of printing or paper you want to go with, I encourage you to experiment to see what gives you a nice, secure dial but is still easy to cut.
Cat optional
Assembly
I cut the straight lines and dial cut-out with an X-ACTO and mat — the rest with scissors that probably could have been sharper.
Cut the little pieces firstLike so. Note the round hole in the center of the dial.Cut out a rotor gizmo and the button like so. I printed the outline for these just off to one side of the back of the program — but, uh, didn’t take a picture of that side. My bad. But note the center circle of the gizmo is the same size as the hole in the dial.Fold up two opposing petals of the gizmo and apply glue stick (mine was purple)Glue those two opposite petals to the center of the face with party namesCrimp the remaining two loose petalsSqueeze these through the hole in the dialFlatten it outLike soApply glue stickStick on the button. This holds the dial open and looks polishedSolid.
It took about an hour to do ten of these.
I recommend seasons of Archer for this also.
Display
I a-a-a-almost bought a bunch of little baskets for all the weddings holding-twee-items needs. But then I was like, dude, I don’t want to have to sweat collecting these all later (little did I know certain caboose-savers would sweat it for me, but, again, that is a story for another day.)
Cardboard + wrapping paper = good times
Naturally the boxes the postcards arrived packed in from Overnight Prints were just the right size for holding the stack of programs. So I just took my roll of nice wedding wrapping paper and wrapped that cardboard box! A little tissue paper and the programs were nice and stable and vertical and ready for plucking.
And guests could still fan themselves if they really got the notion.